


In this blogpost series we will zoom in on the use of DataTables in a Django application with HTML frontend. In this post we will focus on adding a basic jQuery DataTable in our Django project. Our next articles will further elaborate on:
- Styling
- Passing data from a Django view to the table
- Basic configuration options
- Basic filtering
- Sorting and ordering (including dates)
- Using multiple choice column filters
- Using date filters
What is DataTables?
DataTables is a free, easy, and interactive HTML table library form CloudTables. It allows developers to build tables with advanced interactive functionalities in applications with a HTML frontend. I personally really enjoy this library since it provides a lot of advanced functionalities which are hard to create yourself in a standard HTML table. You can read more about DataTables on their website.
Creating a basic DataTable in your project
In this tutorial we will create a basic DataTable in our Django project. I use an existing Django project I created named tableapp. You can either follow along in your own project, or download or clone my exact project on my Github page. Whatever you prefer!
Adding the DataTable CDN and Script
I have created a new blank HTML file named table1.html. The first thing we need to do is add the CDN and Script so we can use the DataTable technology. Add the following two lines in your headers of your html file.
table1.html

<link rel="stylesheet" type="text/css" href="https://cdn.datatables.net/1.11.5/css/jquery.dataTables.css">
<script type="text/javascript" charset="utf8" src="https://cdn.datatables.net/1.11.5/js/jquery.dataTables.js"></script>
Datatables is powered by jQuery. We will also have to add the script for this javascript library to make sure that datatables will work. Also put the code below in the headers of your html file.
table1.html

 <script src="https://code.jquery.com/jquery-3.4.1.slim.min.js" integrity="sha384-J6qa4849blE2+poT4WnyKhv5vZF5SrPo0iEjwBvKU7imGFAV0wwj1yYfoRSJoZ+n" crossorigin="anonymous"></script>
Some of you will have a base.html file which you extend to your other templates. I advise to paste the links there if you do this.
Create a HTML table
Now we need to create a simple HTML table. For this example I have created a simple HTML table with 6 headers suitable for holding data regarding football clubs. You can use any example you would like, but it is critical that you specify table headers (<thead></thead>) and the table body (<tbody> </tbody>) tags. These are required for the technology to work.
table1.html

<table id="test" class="display">
                <thead>
                    <tr>
                        <th>Name</th>
                        <th>Country</th>
                        <th>City</th>
                        <th>Stadium</th>
                        <th>Capacity</th>
                        <th>Established on</th>
                        <th>Record created on</th>
                    </tr>
                </thead>
                <tbody>
                    <tr>
                        <td>NAC Breda</td>
                        <td>NL</td>
                        <td>Breda</td>
                        <td>Rat Verlegh Stadion</td>
                        <td>19000</td>
                        <td>19-9-1912</td>
                        <td>28-02-2022 14:00:00</td>

                    </tr>

                    <tr>
                        <td>Union Sint-Gillis</td>
                        <td>BE</td>
                        <td>Vorst</td>
                        <td>Joseph Marien Stadion</td>
                        <td>8081</td>
                        <td>01-11-1897</td>
                        <td>28-02-2022 13:30:00</td>

                    </tr>

                    <tr>
                        <td>Go Ahead Eagles</td>
                        <td>NL</td>
                        <td>Deventer</td>
                        <td>De Adelaarshorst</td>
                        <td>10400</td>
                        <td>02-12-1902</td>
                        <td>27-11-2021 13:30:00</td>

                    </tr>

                </tbody>
            </table>
Add javascript and link table
The final thing we need to do is adding the javascript that initiates the table. Add the following code at the bottom of your html file in script tags.
table1.html

<script>
    $(document).ready(function() {
        $('#test').DataTable();
    } );
</script>
We use the id of our table (test) in the script so our table is connected to our javascript code. Your table is now ready! In my application the table looks like this:
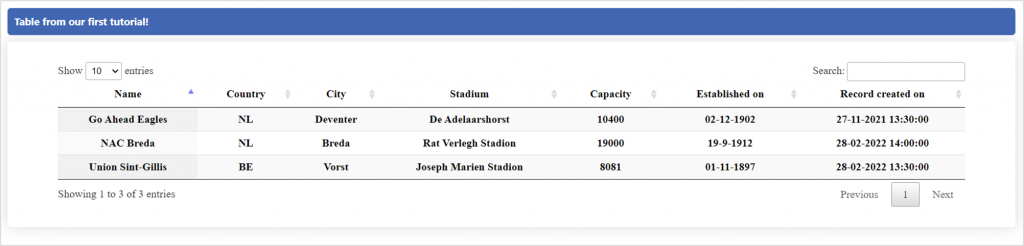
I have added some basic css in my css file to set the width of my table and create a margin at the top and bottom. Beware, the id of your table is extended with _wrapper. You need to keep this in mind when writing the css for styling.
main.css

#test_wrapper{
    width: 90% ;
    margin-top: 30px;
    margin-bottom: 30px;
}
We now have a basic table!
We have succesfully created a basic DataTable with dummy data. You will notice that the filtering, ordering, and pagination is working immediatly! Later on I will show how you can further configure the table and improve the styling. In addition, I will show you how you can pass data from your database to the datatable through a JsonResponse in your view!


Goeie leer materiaal. Welgedaan.