In this tutorial series we will focus on sending emails through our Django app with Gmail. Over the course of three posts we will explain:
- Configuration and Basics of Sending Emails with Gmail
- Using Nice Looking HTML Templates on your emails
- Passing in variables and links into your emails
In this post we pass variables and links into our email templates. The full code of the project is available on GitHub. Videos of the tutorial are available on Youtube.
This post will still be usefull for you without reading the previous articles. But if you need more information about my code, it could help you to go back to earlier articles or the videos.
In todays post…
To get user specific information into our emails (including variables and links) we will:
- Create a user in our application
- Change the code of our views.py file to pass variables into our email
- Change our email template to display these variables.
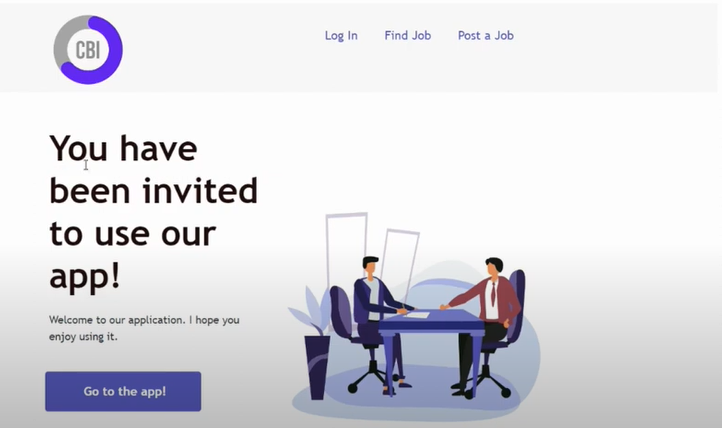
This will make sure that we will see the users name in our email instead of the generic text below..

Creating a user in our application
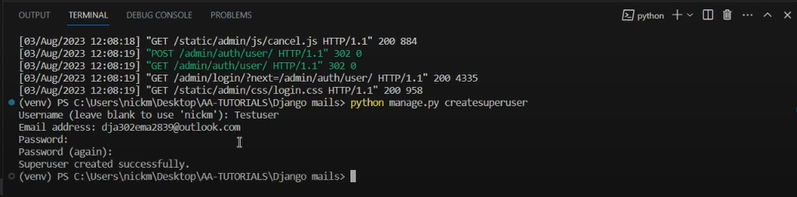
Because I want to display user specific information I will need to create a user in my app. In my terminal I use the following command to create a user:
python manage.py createsuperuserAfter this command the terminal will request me to enter a username, email adress, and a password (including password confirmation).
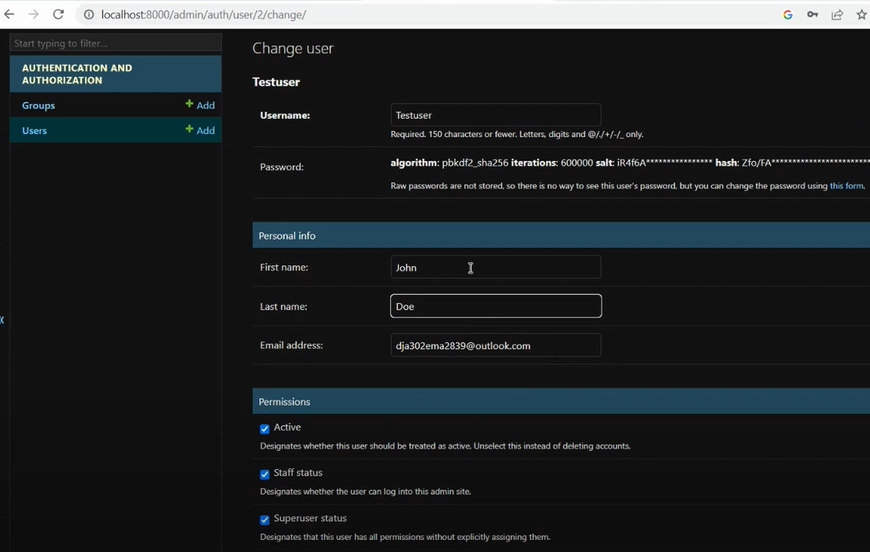
Next, we go to the admin portal of our app (localhost:8000/admin) to add some additional variables to our user including a first and last name. We will use these values in our email template.
Change the view.py file
We are going to make a few changes compared to our last post. We start by importing the user model on the top of our views.py file.
from django.contrib.auth.models import User- We add an if statement that evaluates whether the user is in the database. If the user is in the database we get the user and we create a welcome message that includes the users first and last name. If the user is not there, we display a string as the welcome message. In both cases we display the same link towards our app.
if User.objects.filter(email=my_recipient).exists():
user = User.objects.get(email=my_recipient)
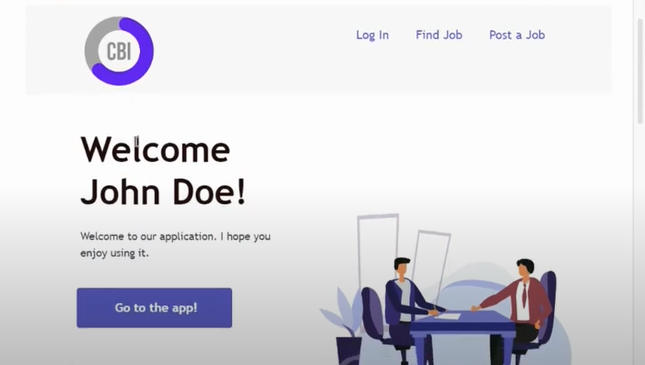
welcome_message = "Welcome "+ user.first_name+ " "+ user.last_name +"!"
else:
welcome_message = "You have been invited to use our app!"
link_app = "http://localhost:8000"- We place our variable names into a context variable.
context = {
            "welcome_message": welcome_message,
            "link_app": link_app
}- We pass the context into our html message, so that we can pass these variables into our email message.
html_message = render_to_string("content/email.html", context=context)This results in this complete view for sending emails:
from .forms import EmailForm
from .models import Emails
from django.views.generic import ListView,FormView
from django.core.mail import send_mail, EmailMultiAlternatives
from django.template.loader import render_to_string
from django.utils.html import strip_tags
from django.contrib.auth.models import User

class BasicEmailView(FormView, ListView):
    template_name = "content/home.html"
    context_object_name = 'mydata'
    model = Emails
    form_class = EmailForm
    success_url = "/"

    def form_valid(self, form):
        my_subject = "Email from our Django App"
        my_recipient = form.cleaned_data['email']

        if User.objects.filter(email=my_recipient).exists():
            user = User.objects.get(email=my_recipient)
            welcome_message = "Welcome "+ user.first_name+ " "+ user.last_name +"!"
        else:
            welcome_message = "You have been invited to use our app!"

        link_app = "http://localhost:8000"

        context = {
            "welcome_message": welcome_message,
            "link_app": link_app
        }

        print(my_recipient)
        html_message = render_to_string("content/email.html", context=context)
        plain_message = strip_tags(html_message)

        message = EmailMultiAlternatives(
            subject = my_subject,
            body = plain_message,
            from_email = None ,
            to= [my_recipient]
        )

        message.attach_alternative(html_message, "text/html")
        message.send()


        obj = Emails(
            subject = my_subject,
            message = "We have send this email",
            email = my_recipient
        )
        obj.save()


        return super().form_valid(form)
Passing the variables into our html template
Now that we have defined our variables, it is time to pass them into our email template. And we do this by passing the variable inside two parenthesis {{VARIABLE_NAME}}. I go to my email.html file and change two parts of the code to our variables.
The welcome_message variable will replace the Welcome aboard text. We look for the static text in our email.html file.

And we replace that string with {{welcome_message}}:
<div style="color:#1f0b0b;font-family:Montserrat, Trebuchet MS, Lucida Grande, Lucida Sans Unicode, Lucida Sans, Tahoma, sans-serif;font-size:46px;line-height:120%;text-align:left;mso-line-height-alt:55.199999999999996px;">
		<p style="margin: 0; word-break: break-word;"><strong><span>{{welcome_message}}</span></strong></p>
</div>
Next, we change the href of the button inside or our email template to our link variable {{link_app}}:
<a href={{link_app}} target="_blank" style="text-decoration:none;display:inline-block;color:#ffffff;background-color:#5855bd;border-radius:4px;width:auto;border-top:0px solid #8a3b8f;font-weight:undefined;border-right:0px solid #8a3b8f;border-bottom:0px solid #8a3b8f;border-left:0px solid #8a3b8f;padding-top:10px;padding-bottom:10px;font-family:Montserrat, Trebuchet MS, Lucida Grande, Lucida Sans Unicode, Lucida Sans, Tahoma, sans-serif;font-size:16px;text-align:center;mso-border-alt:none;word-break:keep-all;"><span style="padding-left:50px;padding-right:45px;font-size:16px;display:inline-block;letter-spacing:normal;"><span style="word-break: break-word; line-height: 32px;"><strong>Go to the app!</strong></span></span></a>In this example the links are same for all users. You could redirect the users to specific pages based on their user id’s if you want.
The end result!
When I input the email adress of the user in the database I receive an email with the correct first and last name!
I try the same with a email adress that is not in the database, which provides we with a more generic email.