In this blogpost series we will zoom in on the use of DataTables in a Django application with HTML frontend. In our previous post we showed how you can integrate a Jquery DataTable in your Django application. In this post we will focus on adding the data from our database to the table through a JSON Response. The full code can be found on my Github.
We need to complete the following actions to show our data in the table:
- Create a url endpoint for our Json reponse in the urls.py file
- Create the Json reponse in our views.py file
- Creating a new html template with url and view
- Testing the Json Response
- Connect the data to our table in our table
Our model structure
In this particular series I use a very small dataset of football clubs with their stadium, capacity, and characteristics. The model we will be using for creating the table is called Tabledata.
models.py
class TableData(models.Model):
    name = models.CharField(max_length=200, unique=True)
    attendance = models.IntegerField(blank=True, null=True)
    stadium = models.CharField(max_length=200,blank=True, null=True)
    characteristics = models.ManyToManyField(Characteristics,blank=True, null=True)
    created_at = models.DateTimeField(auto_now_add=True)
    edited_at = models.DateTimeField(auto_now=True)

    def __str__(self):
        return self.name
Creating a url endpoint in our urls.py file
The first thing on our list is creating a url endpoint for our Json reponse. Go to your urls.py file and create the new endpoint (in red below):
urls.py

from django.contrib import admin
from django.urls import path, include
from table import views as view


urlpatterns = [
    path('table1/', view.table1, name='table1'),
    path('multiplechoicefield/', view.modelmultiplechoicefield, name='modelmultiplechoicefield'),
    path('', view.home, name='home'),
    path('jsonresponse/footballclubs', view.footballclubs, name='footballclubs'),
]
Creating the Json response in our views.py file
Next, we need to create a view called footballclubs where we create the Json reponse. On top of our views.py file we import the Json reponse package. Below the import we write the logic for our response. In the view we create a list based on our TableData objects. With the .values() command we can specify which fields we want to include in the response.
views.py

from django.http import JsonResponse

def footballclubs():
    result_list = list(TableData.objects.all()\
                .values('name',
                        'attendance',
                        'stadium',

                        'created_at',
                        'edited_at',
                        'id',
                       ))

    return JsonResponse(result_list, safe=False)
Creating our HTML file
I’m going to create a new html file with view and url for our new table. First, we create a template called table2.html.
table2.html
{% extends 'table/base.html' %}
{% block content %}
    <div class="pageholder">
        <div class="titleholder">
            <a class="ourbutton mr-2 ml-2" href="{% url 'home'%}"> To home</a>
            <div class="title"><i class="fa-solid fa-table"></i> Table from our second tutorial! </div>
        </div>

        <div class="linkholder">

        </div>
    </div>


{% endblock %}
Second, we create view for the template where we specify the html template.
views.py

def table2(request):
    context = {}
    return render(request, 'table/table2.html',context)
Last, we create a url endpoint (green below) for our view in the urls.py file.
urls.py

from django.contrib import admin
from django.urls import path, include
from table import views as view


urlpatterns = [
    path('table1/', view.table1, name='table1'),
    path('table2/', view.table2, name='table2'),
    path('multiplechoicefield/', view.modelmultiplechoicefield, name='modelmultiplechoicefield'),
    path('', view.home, name='home'),
    path('jsonresponse/footballclubs', view.footballclubs, name='footballclubs'),
]
Testing our Json Response
Now we will test in our template whether our Json reponse works. We do this with an Ajax call. Add the following lines of code in your base.html file, or on top of your html file (in my case table2.html).
<script src="https://code.jquery.com/jquery-3.6.0.js" integrity="sha256-H+K7U5CnXl1h5ywQfKtSj8PCmoN9aaq30gDh27Xc0jk="crossorigin="anonymous"></script>
    <link rel="stylesheet" type="text/css" href="https://cdn.datatables.net/1.11.5/css/jquery.dataTables.css">
    <script type="text/javascript" charset="utf8" src="https://cdn.datatables.net/1.11.5/js/jquery.dataTables.js"></script>
    <link rel="stylesheet" href="https://stackpath.bootstrapcdn.com/bootstrap/4.1.3/css/bootstrap.min.css" integrity="sha384-MCw98/SFnGE8fJT3GXwEOngsV7Zt27NXFoaoApmYm81iuXoPkFOJwJ8ERdknLPMO" crossorigin="anonymous">
Add the following script on the bottom of your html file. In the script, we refer to the name that we specified in the urls.py file (footballclubs). This script will fetch our data.
table2.html
<script>
$.ajax({
url: "{% url 'footballclubs'%}",
method: 'GET',
success: function (data) {
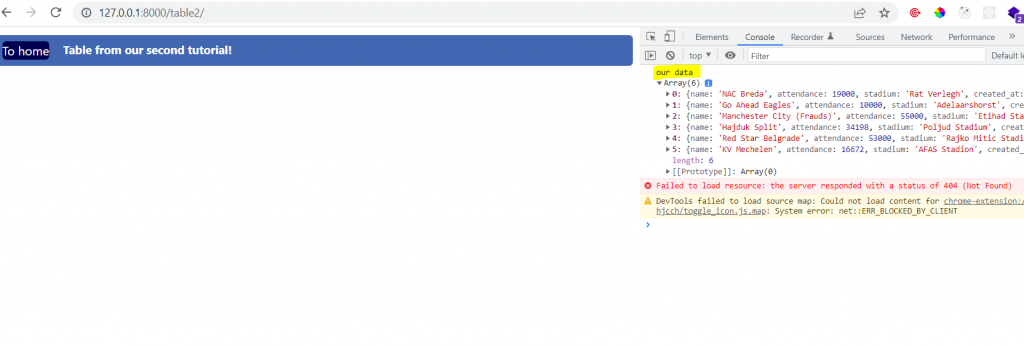
console.log('our data',data);
}
});
</script>When we start our server and access our console (control+shift+j) we will see the data! This means that it works.
Adding it to a datatable
It is time to add the DataTable to our template, including the Json response. Our complete table2.html file is displayed below.
- The red code is our table. We only need to specify the table head inside the table. The columns will be displayed in our scripts. The id is ourtable2. Make sure that you use the same id in the table.
- The green script text is the DataTable. Here we place an ajax response, and we can specify the column. Be sure to use the exact names specified in your values list (and models).
table2.html

{% extends 'table/base.html' %}
{% block content %}
    <div class="pageholder">
        <div class="titleholder">
            <a class="ourbutton mr-2 ml-2" href="{% url 'home'%}"> To home</a>
            <div class="title"><i class="fa-solid fa-table"></i> Table from our second tutorial! </div>
        </div>

        <div class="linkholder">
            <table id="ourtable2" class="beheertable dezetabel">
                <thead>
                    <tr>
                        <th>Name</th>
                        <th>Stadium</th>
                        <th>Attendance</th>
                        <th>Created at</th>
                        <th>Edited at</th>
                    </tr>
                </thead>
            </table>
        </div>
    </div>


<script>
    $(document).ready(function() {
        var table = $('#ourtable2').DataTable({
           "ajax": {
              "processing": true,
              "url": "{% url 'footballclubs' %}",
              "dataSrc": "",
            },
            "columns": [
                    { "data": "name"},
                    { "data": "stadium"},
                    { "data": "attendance"},
                    { "data": "created_at"},
                    { "data": "edited_at"},
                ],
        });
    });
</script>
{% endblock %}
All set!
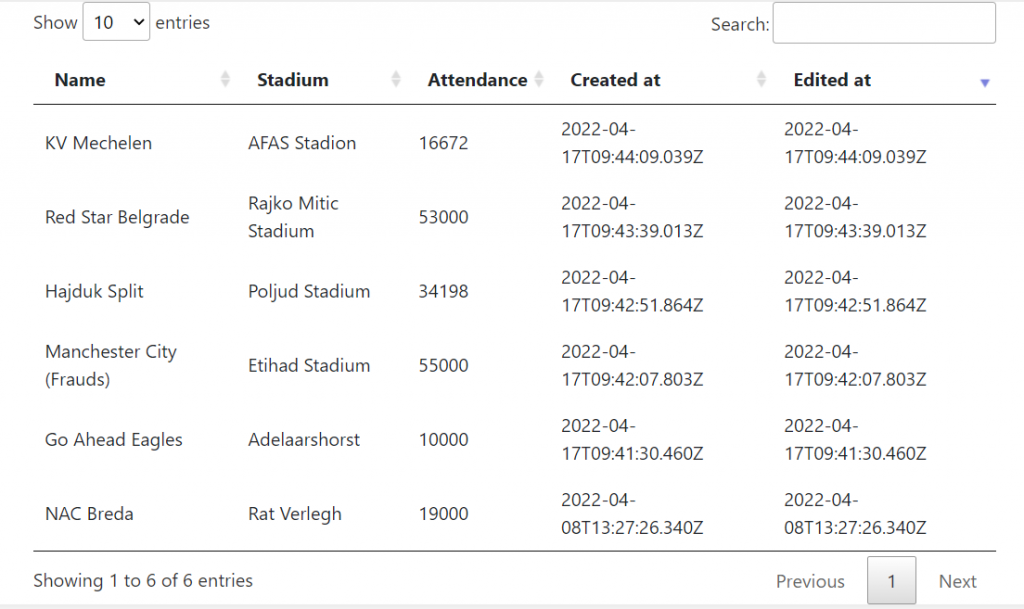
We have completed our task! The data from the database is now displayed in our table. Of course, when you look at the table there are some things we still need to fix. For example, our dates are displayed in a weird format. In addition, I also want to display our characteristics attribute, which has multiple responses per record. In addition, I want to change the styling and use custom filters. This will all come in the next posts!