


In this tutorial we build a full stack scheduling application with Python Django in the backend, and ReactJs in the frontend. In our previous post we created a database model and explored API endpoints with Django Rest Framework. In this blogpost we will start the integration of our ReactJS frontend.
The progress of integrating React is quite complex. Don’t worry, it is not important to know everything about the settings and configuration. Once this part of the tutorial is over we can start coding, and actually focus on building our application!
The full code is available here.
Creating frontend folder
We start of by creating a Django app where we can store all of our frontend files. Execute the command below to create a frontend app in the scheduler_project folder. Make sure that you are in the right folder when executing the command!
(venv) PS C:\Users\nickm\Desktop\Scheduler\scheduler_project>
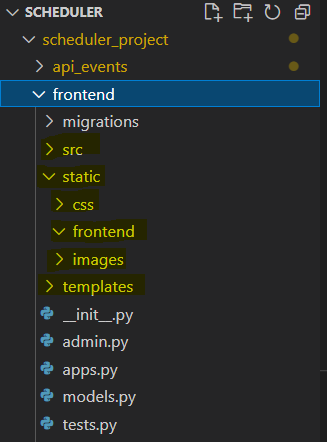
django-admin startapp frontendA folder named frontend will appear on the same level as the api_events and scheduler_project folders. Within the frontend folder we need to create three new folders named static, src, and templates.Within the static folder we again need to create 3 folders, named frontend, css, and images. You can create the folders with your file explorer or the user interface of visual studio code. Your structure should look like this when you are finished.
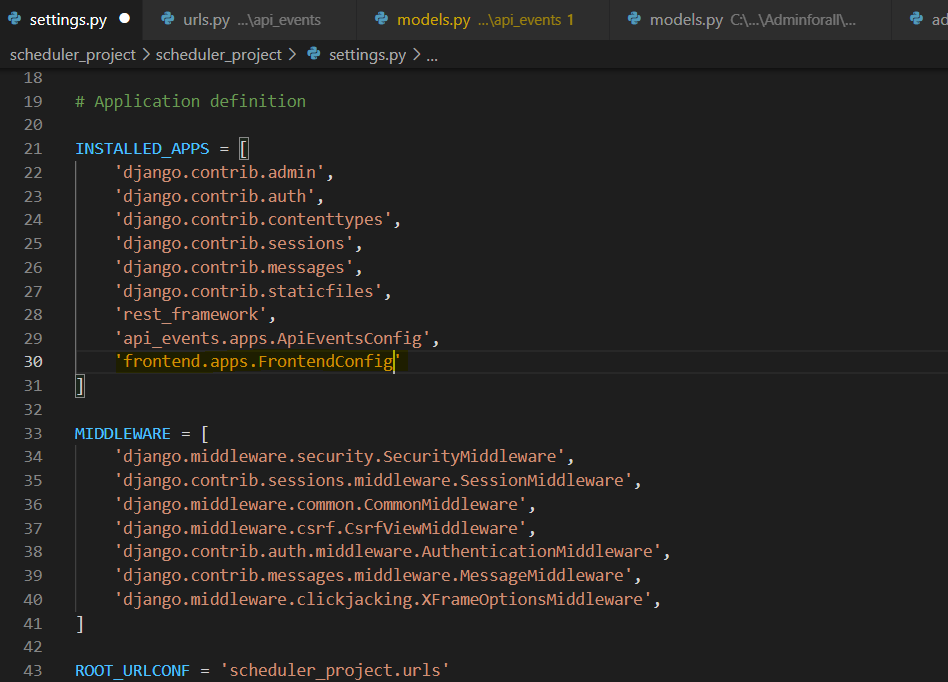
All new Django apps need to be registered in our settings.py file. Navigate to the file and add the frontend filder in the installed apps section as illustrated below. We hebben een nieuwe app toegevoegd.
Installing frontend packages
Our frontend folder is set up, now it is time to install some packages for our frontend. First, we navigate into our frontend folder with the command below.
(venv) PS C:\Users\nickm\Desktop\Scheduler\scheduler_project>
cd frontend
Time to install some packages (Make sure that your virtual environment is activated if you use one).
(venv) PS C:\Users\nickm\Desktop\Scheduler\scheduler_project\frontend> SPORTAPP\sport_project\frontend>
npm init -y
You will notice that a package.json file has been added to your frontend folder. We are now ready to install React, Babel, Material UI and Webpack. Execute the commands below one by one and make sure that you are still in the frontend folder when doing so.
(venv) PS C:\Users\nickm\Desktop\Scheduler\scheduler_project\frontend>

npm i webpack webpack-cli --save-dev
npm i @babel/core babel-loader @babel/preset-env @babel/preset-react --save-dev
npm i react react-dom --save-dev
npm install @mui/material @emotion/react @emotion/styled
npm install @babel/plugin-proposal-class-properties
npm install react-router-dom
npm install @material-ui/icons
Creating extra files in the frontend folder
We will now create and edit several files in the frontend folder. I recommend that you just copy the codes from the codeblock, this makes your life a lot easier. First, create a file named babel.config.json and add the code below.
scheduler_project\frontend\babel.config.json
{
    "presets": [
      [
        "@babel/preset-env",
        {
          "targets": {
            "node": "10"
          }
        }
      ],
      "@babel/preset-react"
    ],
    "plugins": ["@babel/plugin-proposal-class-properties"]
  }
Next we create a file named webpack.config.js with the following code:
scheduler_project\frontend\webpack.config.js

const path = require("path");
const webpack = require("webpack");

module.exports = {
  entry: "./src/index.js",
  output: {
    path: path.resolve(__dirname, "./static/frontend"),
    filename: "[name].js",
  },
  module: {
    rules: [
      {
        test: /\.js$/,
        exclude: /node_modules/,
        use: {
          loader: "babel-loader",
        },
      },
      {
        test: /\.css$/,
        use: [ 'style-loader', 'css-loader' ]
      },
      {
        test: /\.(png|jpe?g|gif)$/i,
        use: [ 'file-loader' ]
      }
    ],
  },
  optimization: {
    minimize: true,
  },
  plugins: [
    new webpack.DefinePlugin({
      "process.env": {
        // This has effect on the react lib size
        NODE_ENV: JSON.stringify("development"),
      },
    }),
  ],
};
Now we make a small change to the package.json file in the frontend folder. Replace everything under scripts with the following code:
 "scripts": {
    "dev": "webpack --mode development --watch",
    "build": "webpack --mode production"
  },
Setting up templates
We have now completed the integration of React. We now need to make sure that our application will show our React templates instead of the DJango html templates. The following actions are required:
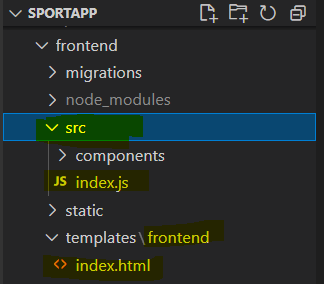
- In the src folder inside the frontend folder, create a file named index.js.
- In the templates folder inside the frontend folder, create an extra folder named frontend.
- In the frontend folder inside the templates folder, create a file named index.html.
Your frontend folder should look like the image below.
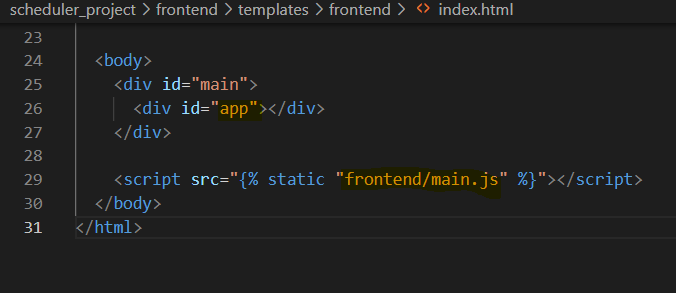
Add the following code to your index.html file.
scheduler_project\frontend\templates\frontend\index.html
<!DOCTYPE html>
<html>
<head>
<meta charset="UTF-8" />
<meta name="viewport" content="width=device-width, initial-scale=1" />
<title>Our scheduler app!</title>
{% load static %}
<script src="https://ajax.googleapis.com/ajax/libs/jquery/3.5.1/jquery.min.js"></script>
<link
rel="stylesheet"
href="https://fonts.googleapis.com/css?family=Roboto:300,400,500,700&display=swap"/>
<link rel="stylesheet" type="text/css" href="{% static "css/index.css" %}"/>
<link rel="stylesheet" href="https://unpkg.com/leaflet@1.7.1/dist/leaflet.css"
integrity="sha512-xodZBNTC5n17Xt2atTPuE1HxjVMSvLVW9ocqUKLsCC5CXdbqCmblAshOMAS6/keqq/sMZMZ19scR4PsZChSR7A=="
crossorigin=""/>
<!-- Make sure you put this AFTER Leaflet's CSS -->
<script src="https://unpkg.com/leaflet@1.7.1/dist/leaflet.js"
integrity="sha512-XQoYMqMTK8LvdxXYG3nZ448hOEQiglfqkJs1NOQV44cWnUrBc8PkAOcXy20w0vlaXaVUearIOBhiXZ5V3ynxwA=="
crossorigin=""></script>
</head>
<body>
<div id="main">
<div id="app"></div>
</div>
<script src="{% static "frontend/main.js" %}"></script>
</body>
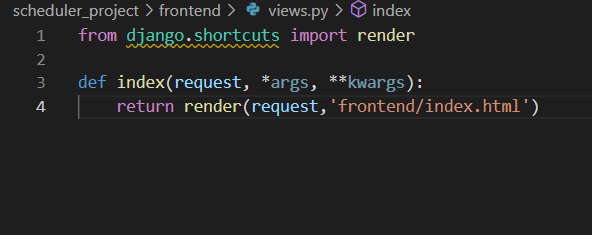
</html>Add the following code to the views.py file in the frontend folder. This will link the index.html file to our view.
scheduler_project\frontend\views.py
from django.shortcuts import render
def index(request, *args, **kwargs):
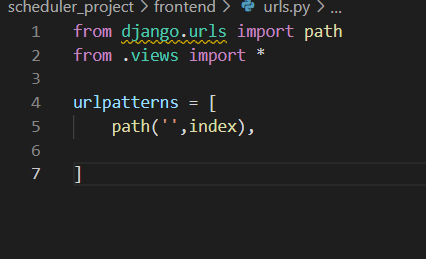
return render(request,'frontend/index.html')Now create a urls.py file in the frontend folder with the code below. This will link the view we just created our applications endpoint.
scheduler_project\frontend\urls.py
from django.urls import path
from .views import *
urlpatterns = [
path('',index),
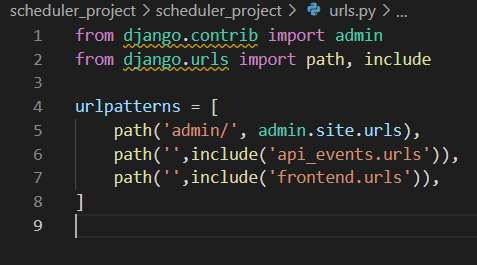
]We will now proceed to add the urls from our frontend folder to our overarching Django project. This will connect our endpoint from the frontend app to our application. Make sure that your urls.py file in the schedule_project folder looks like this:
scheduler_project\scheduler_project\urls.py
from django.contrib import admin
from django.urls import path, include
urlpatterns = [
path('admin/', admin.site.urls),
path('',include('api_events.urls')),
path('',include('frontend.urls')),
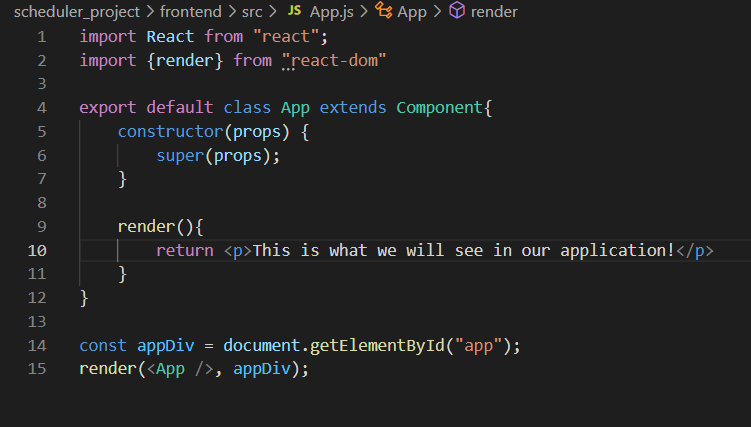
]We are almost done! Go to the src folder in the frontend folder and create a file named App.js. This is the file where we will bundle our React code, and we will write our first React code in this location. Paste the code below in the file:
scheduler_project\frontend\src\App.js
import React, { Component } from "react"
import {render} from "react-dom"
export default class App extends Component{
constructor(props) {
super(props);
}
render(){
return <p>This is what we will see in our application!</p>
}
}
const appDiv = document.getElementById("app");
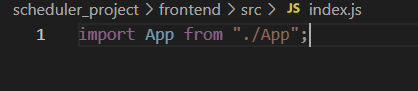
render(<App />, appDiv);The code renders a p tag which will write the text “This will be visible in our app!” in our application. Go to the index.js file, and register the App component by pasting the following line of code in the file.
scheduler_project\frontend\src\index.js
import App from "./App";
What did we just do?
We just pasted a lot of different codes in a lot of different files. But what is taking care of what, and how do our frontend and backend integrate? Babel and Webpack are responsible for compiling our Javascripts files. They make sure that we browser is able to read and show our code. In this tutorial, that is all you need to know about these packages.
But how do React and Django work together in our project?
- In our scheduler_project app we import all the urls from the urls.py file from the frontend folder. This makes sure that all urls from the frontend are connected to our scheduler_project app.
- If you look at the urls.py file in the frontend folder you will notice that it points to the index view in the views.py file.
- If you check the index view in our views.py file you will see that this view displays the index.html template. Meaning that the end user will see this template on the screen of our application.
- If you check the index.html file you will see that the body of this file displays a div with the id app, and that there is a script mentioned from the file main.js.
- If you now check the index.js file, you will notice that we import everything from the App.js file. In our App.js file we export all of our written code to a div with the id of app. And that is the reason that in the end, we will see the code written in our App.js file on our screen of the application.
The end result!
Let’s see if everything works. Open a terminal and make sure that you are in the scheduler_project directory. Now start the backend server with the following command.
(venv) PS C:\Users\nickm\Desktop\Scheduler\scheduler_project>
python manage.py runserver
Now we will open an extra terminal, and also start up our frontend. First navigate to the frontend folder, and then type in the following command:
(venv) PS C:\Users\nickm\Desktop\Scheduler\scheduler_project\frontend>
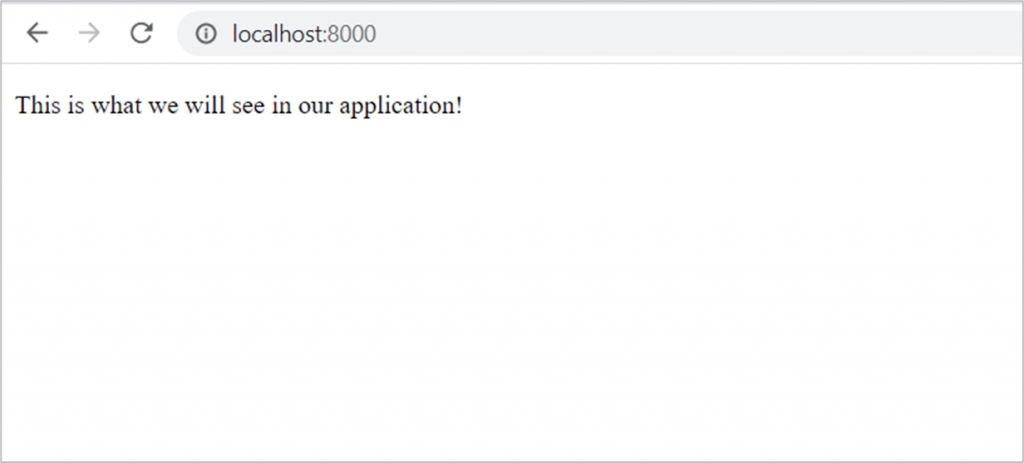
npm run devYou now have two active terminals. Navigate to the link displayed in the python terminal (http://127:0.0.1:8000/). Now a web page will open and the text from our App.js file will be displayed.

The end!
We have now integrated Django with ReactJs. This was the hardest part of the tutorial. From now on we can focus on the actual development with Django and React, and build a cool scheduler application!
Next: Creating our first JS pages and introducing React Router.


Please, what if I want to deploy an app like this, how do I go about it?
Hi Victor,
I am currently writing a blogpost about deploying Django on Azure. My next set of tutorials I will try to deploy Django + React to Azure.
Kind regards,
CBI Analytics
the SRC folder is not created in any of these steps. I had to make it myself but it will not run because its missing components. This app does not run in the end.
looks like you need to redo this tutorial. Hours spent and it does not work now. running
npm run dev this happens.
ERROR in ./src/index.js
Module build failed (from ./node_modules/babel-loader/lib/index.js):
Error: Cannot find module ‘fs/promises’
Require stack:
– L:\Websites\Scheduler\scheduler_project\frontend\node_modules\babel-loader\lib\cache.js
– L:\Websites\Scheduler\scheduler_project\frontend\node_modules\babel-loader\lib\index.js
– L:\Websites\Scheduler\scheduler_project\frontend\node_modules\loader-runner\lib\loadLoader.js
– L:\Websites\Scheduler\scheduler_project\frontend\node_modules\loader-runner\lib\LoaderRunner.js
– L:\Websites\Scheduler\scheduler_project\frontend\node_modules\webpack\lib\NormalModuleFactory.js
– L:\Websites\Scheduler\scheduler_project\frontend\node_modules\webpack\lib\Compiler.js
– L:\Websites\Scheduler\scheduler_project\frontend\node_modules\webpack\lib\webpack.js
– L:\Websites\Scheduler\scheduler_project\frontend\node_modules\webpack\lib\index.js
– L:\Websites\Scheduler\scheduler_project\frontend\node_modules\webpack-cli\lib\webpack-cli.js
– L:\Websites\Scheduler\scheduler_project\frontend\node_modules\webpack-cli\lib\bootstrap.js
– L:\Websites\Scheduler\scheduler_project\frontend\node_modules\webpack-cli\bin\cli.js
– L:\Websites\Scheduler\scheduler_project\frontend\node_modules\webpack\bin\webpack.js
at Function.Module._resolveFilename (internal/modules/cjs/loader.js:957:15)
at Function.Module._load (internal/modules/cjs/loader.js:840:27)
at Module.require (internal/modules/cjs/loader.js:1019:19)
at require (internal/modules/cjs/helpers.js:77:18)
at Object. (L:\Websites\Scheduler\scheduler_project\frontend\node_modules\babel-loader\lib\cache.js:21:5)
at Module._compile (internal/modules/cjs/loader.js:1133:30)
at Object.Module._extensions..js (internal/modules/cjs/loader.js:1153:10)
at Module.load (internal/modules/cjs/loader.js:977:32)
at Function.Module._load (internal/modules/cjs/loader.js:877:14)
at Module.require (internal/modules/cjs/loader.js:1019:19)
webpack 5.89.0 compiled with 1 error in 449 ms
Thanks for you comment. I recently uploaded a new tutorial on my youtube channel that is more up to date!